

How To Create Rules In Quickbooks Online
If you're not familiar with bank rules, let's start there. Bank rules are a way for you to ask QuickBooks Online (and QuickBooks desktop) to prefill some information when transactions are downloaded from the bank. If you're familiar with the phrase, it falls into the category of "if this, then that".
When you download transactions from the bank, you're putting them in a to-do list for you (as the human) to assign a name, an account/category and add them to the bank (or credit card) register.
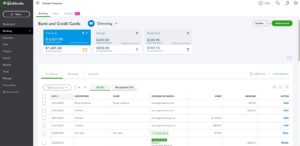
In this example, there are 25 transactions for the checking account that need to be resolved. Looking at the 2nd, 3rd and 4th lines we can see that these are all transactions related to "A Rental" and we can assume that the expense account is the same for all three. This is a great example of how bank rules can save you time. Instead of naming and correcting the expense account for all three of these, QuickBooks can do that for us.
Click on a transaction, in this case, I clicked on the $1,200.
On the bottom left hand corner of the box that just opened or expanded you'll see a blue hyperlink that says "create rule from this transaction". Doing this will open a new screen, the bank rule screen! Are you surprised? 😉

To create a rule, you'll need to fill in the boxes.
- Rule name = this is the name that will be used to sort your list alphabetically. This is just for you.
- For = does this apply for money going into OR out of your bank account(s)?
- In = does this rule apply to all of your bank accounts, just some of them, just one? You pick!
- When a transaction meets [ ] conditions. I change this to say "any" and not "all".
- Drop down lines, I click on "add line", I have the first field say "bank text", the second field say "contains" and then for the bank field I copy and paste the bank text from the downloaded data.
- Transaction type = what is this? Is this an expense? A transfer? Pick whatever applies.
- Payee = who (human or business name) is getting the funds
- Category = what account on the chart of accounts applies to this situation?
- Memo = Do you want a memo to automatically appear?
- How do you want to apply this rule? Auto-categorize and automatically add to your register without stopping at the bank feeds screen or auto-categorize and manually review? Pick whichever you'd prefer. I recommend manual review until you get comfortable.
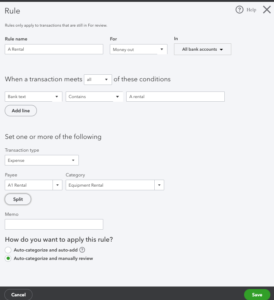
Above you can see how I set this up for my example.
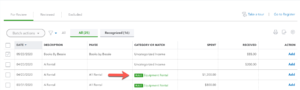
Above you can see how using bank rules changed the bank feeds. QuickBooks Online automatically renamed the payee from a blank field and changed the expense from uncategorized expense to the expense account I picked.
You'll notice that the $200 deposit isn't renamed and the account isn't updated. This is because the rule you just created ONLY applies to money out and not to money in.
Want to play around in the sandbox without messing up your QuickBooks Online data file? Here is the link to Intuit's tester file: https://qbo.intuit.com/redir/testdrive
If you'd prefer to watch a video tutorial, a video is below:
- How to Reconnect Your BECU Accounts to QuickBooks
- QuickBooks Online for Small Business Owners – Part 2
- QuickBooks Online for Small Business Owners – Part 1
- Reconciling QuickBooks: How To Fix a Wrong Beginning Balance
- How To Reconcile an Account in QuickBooks Online
How To Create Rules In Quickbooks Online
Source: https://www.gentlefrog.com/how-to-use-bank-rules-in-quickbooks-online/
Posted by: grissomfrinslazince.blogspot.com
0 Response to "How To Create Rules In Quickbooks Online"
Post a Comment